lemon pie hawaiian
Posted: July 4, 2021 Filed under: desserts | Tags: brown sugar, butter, coconut, egg whites, egg yolks, lemon juice, lemon pudding mix, pastry shell, pineapple, sugar, water Leave a comment
The Hawaiian Pie Of My Eye
This pie definitely tastes like it flew straight out of the 1950s or 60s and flashed forward into my mouth. And based on where this recipe was located in my Mom Betty’s cookbook, I’m likely not that far off on its origins. I’ll continue some research to see if I can determine the publication for this recipe because I recognize the size, format and paper.
The original recipe below claims this pie is a cross between lemon chiffon and lemon meringue. I had to Google the difference between both in order to put my stink eye at ease.
I love that this recipe calls for a pre-made pie crust vs. fresh (hey, this era was a time often about making fast meals which were often a combination of part scratch and part ready made). This has a definite sweet-sugary taste which is one of the reasons I recommend unsweetened coconut – you don’t need extra in this.
I’m not sure how Hawaiian this pie actually is but with coconut in it, the taste will likely remind you of soothing tropical sunsets and beautiful beaches. You can read more about my Texas family’s connection to Hawaii through a few more Hawaiian-inspired recipes. Enjoy!
Foodie Tips
❤ What’s a pie shield? It’s typically made of silicon and it can help prevent the top edges of your crust from burning. Here’s ours from Williams-Sonoma which is adjustable and its been a life saver! You can also make your own impromptu version by using foil and shaping it around the crust’s edge.
❤ A word about the filling. We had a lot of filling left over but we didn’t opt to make a second pie as we were on diets (yeah, that’s the ticket)! We poured the extra filling into some custard cups to devour on some weak moments after our initial pie festival.
i. Time
Total prep: Allow 1 hour for Hawaiian pie prep plus 4 hours for chilling.
ii. Ingredients
8 ¼ ounce can | crushed pineapple, drained (I could only find an 8 ounce can of Libby’s)
¼ cup | brown sugar, packed
¼ cup | unsweetened flaked coconut
2 tablespoons | unsalted butter, softened (my Grandmother “Nanny” insisted on Falfurrias)
9-inch | pastry shell, unbaked
4-serving size | regular lemon pudding mix
½ cup | granulated sugar
1 ¾ cup | water
2 | cage free egg yolks, slightly beaten (save the whites for below!)
2 tablespoons | fresh lemon juice
1 tablespoon | more butter
2 | cage free egg whites
¼ cup | more granulated sugar
to garnish | toasted coconut (optional but highly recommended)

iii. What To Do
0. PREP
Set out your butter to soften to room temperature. Preheat your oven to 425°F.
1. MAKE THE PIE BASE
Combine the drained pineapple, brown sugar, ¼ cup of the coconut and 2 tablespoons butter. Spread it over the bottom of the pastry shell.

2. BAKE THE PIE’S BOTTOM
Cover the edge of the pastry with foil or a silicon pie shield. Bake in your preheated oven at 425°F for 15 minutes, removing the crust protector after the first 5 minutes of baking. When done, remove the pie from the oven and set it aside to cool.

3. LET’S MAKE CUSTARDY FILLING
In a medium-sized saucepan over medium-high heat combine the pudding mix with a ½ cup of the granulated sugar. Stir in the water and egg yolks and cook and stir until things are bubbly. Remove from heat. Stir in the lemon juice and the remaining butter. Cover with clear plastic wrap and let things cool, stirring occasionally.
4. LET’S PREP THE WHITES
In a bowl beat the egg whites on high speed with your mixer until you see soft peaks. Gradually beat in the remaining ¼ cup sugar until everything forms stiff peaks. Fold the egg whites into the cooled filling. Pile everything on top of the baked pastry shell.
5. PREPARE FOR DISMOUNT
Place the pie in the fridge for at least 4 hours. When ready to serve garnish with some toasted coconut.
Betty’s Son
Founder and “Nostalgic Food Blogger” of Betty’s Cook Nook

texas kolaches
Posted: October 6, 2020 Filed under: breakfast, desserts | Tags: apricots, butter, egg yolks, eggs, flour, milk, salt, shortening, sugar, water, yeast Leave a comment  Where Old Meets New
In the golden days of past my Mom “Betty” subscribed to Southern Living magazine and to this day, so do I.
In SL’s most recent September 2020 issue they gave claim to the seven “Cooks of the Year” for their culinary innovations. I, too, love innovators for without them we’d be eating the same thing day after day… (fancy some porridge and toast?). But I will continue the foodie fight to honor those in the rear view mirror – the ones who fed our bellies when we were kids. Our Mothers, Grandmothers, and best of all – the ones likely before we can remember. These are the true culinary geniuses who made mealtime a favorite time without the aid of modern kitchen contraptions like microwaves, silicon utensils, immersion blenders, air fryers, and bluetooth ovens (I’m guilty of owning all these items)!
The Missing Piece
With more than 200 recipes here at BettysCookNook.com, the Southern Living kolache recipe fills a missing puzzle piece in my Mom’s culinary legacy; Mom’s kolache filling recipes (below) had been in her cookbook without their much needed pastry crust recipe until now! And since kolaches hold a near and dear place in the heart of Texans right up there with queso, big hair, and cowboy boots you have plenty of recipe ideas thanks to my Mom’s 3 filling recipes below – apricot, prune, and cottage cheese. In addition, there’s a streusel recipe to top things off!
Thanks to Southern Living Magazine I’m gratefully able to connect the past with the present. I hope you try and enjoy this recipe! Thank you, Lydia Faust, for sharing a slice of the great days with the rest of us! #HatsOff
While I usually veer off the I-35 interstate in the city of West, Texas for some of the world famous savory Czech Stop kolaches (bless you, jalapeño, sausage and cheese) let’s not forget their sweet kolache friends! I didn’t make all 3 fillings but the apricot filling was my first pick and it was dy-no-mite! I’d suggest starting with that one first.
This is a recipe for those with a little kitchen grit. I found kolaches much easier to make than homemade tamales (which had me sore for 2 days) or puffy tacos (Joe does most of that work) and you’ll have plenty of leftovers to share with friends and family. I’ll never bat an eye at how much these cost as I found hand making these to be a labor of pure love.
Foodie Tips
❤ This kolache recipe made 53 of the yeasty delights and ironically Mom’s apricot filling recipe filled them all to the last scoop!
❤ It’s customary for the kolaches to touch while baking; they often come out of the oven square-ish. I had giant stainless baking sheet pans so my kolaches came out round. Despite the tweaked shape they tasted the same!
❤ To form the hole we wrapped a spice jar with saran wrap to prevent the dough from sticking and pressed away (shown).
❤ I remember growing-up my Mom’s friend “Miss Joyce” called some savory pigs in a blankey “koblasniky.” Turns out she wasn’t kidding – the sweet treats are kolaches and the savory friends koblasniky. I was happy to confirm in this article. My Moravian ancestors would be proud I stand corrected! Here in Texas folks just refer to anything wrapped in the billowy dough kolaches and we all know what’s involved.

i. Time
Total prep: Your entire morning. (includes 60 minutes for baking)
ii. Ingredients
for the kolache pastry:
1 ½ tablespoons | active dry yeast
½ cup | warm water (105°F – 115°F)
¼ cup | unsalted butter (my Grandmother “Nanny” insisted on Falfurrias)
¼ cup | vegetable shortening (Crisco)
1 ½ cups | lukewarm whole milk (100°F – 105°F)
6 cups | all-purpose flour, divided, plus more for the prep surface
¾ cup | evaporated milk
⅓ cup | granulated sugar
1 tablespoon | kosher salt
2 large | cage free eggs
1 large | cage free egg yolk
5 tablespoons (or more) | unsalted butter, melted
for the apricot filling:
1 pound | dried apricots
¾ cup | granulated sugar
3 tablespoons | unsalted butter
for the streusel:
½ cup | granulated sugar
½ cup | flour
½ cup | butter, melted
iii. What To Do
1. Sprinkle the yeast over warm water and stir to combine. Set aside. Place the butter and shortening in a large microwavable bowl, and microwave on high until melted, about 1 minute. Stir well to combine. Whisk in the lukewarm whole milk and yeast mixture.
2. Transfer the mixture to the bowl of a stand mixer fitted with a whisk attachment. Sift 3 cups of the flour over mixture. Add the evaporated milk, sugar, salt, eggs, and egg yolk. Beat on medium speed until smooth, about 1 minute. Remove the whisk attachment and replace it with a dough hook. Gradually add the remaining 3 cups flour; beat on medium speed until dough is smooth, about 2 minutes. Let the dough sit at room temperature for 5 minutes; then beat it on medium-high speed until the dough is elastic and very smooth, about 10 minutes.
 3. Brush the top of dough with 1 tablespoon of the melted butter. Cover the bowl with plastic wrap and let the dough rise until it has doubled in size, about 1 hour. Punch the dough down and cover it again and let the dough rise until doubled, about 30 more minutes.

4. Generously flour a work surface. Gently roll dough out to a 1-inch-thick rectangle (about 18 x 14 inches). Using a 2-inch round cutter, cut out circles, and place them 1 inch apart on parchment paper-lined baking sheets. Brush the tops with 2 tablespoons of the melted butter. Let rise in a warm place until almost doubled in bulk, about 20 minutes.


 5. While the dough rises, let’s make the apricot kolache filling. Prepare the apricots according to the package directions (I boiled mine in water for about 10 minutes then drained the water). Add the sugar and butter. I used an immersion blender to get things soft but I was careful not to over process it; you still want it a bit thick (not like apple sauce) and a few chunks here and there are OK. Set the filling aside.
6. Let’s continue on by making the posypka (streusel topping): Use a pastry cutter (suggested) or your fingers to combine the sugar, flour, and butter to form a crumbly texture. Store this in the refrigerator until ready to use.
7. Back to the kolaches! Make one small indentation in the center of each dough circle (see tip above or you can use your fingers), and fill each with about 1 tablespoon of the filling. Sprinkle each kolache with 1 to 2 teaspoons of the posypka. Let the kolaches rise until they’ve doubled in size, 20 to 30 minutes.

8. Preheat your oven to 350°F. Position racks in top third and lower third of oven. Bake the kolaches until golden brown, about 20 minutes, rotating baking sheets between top and bottom racks halfway through the baking time. Remove from oven. Brush the kolaches with the remaining 2 tablespoons melted butter and transfer them to wire racks. Cool completely, about 30 minutes.

You may be tired by this point so sit back and enjoy a few bites of the sweet life!
Betty’s Son
Founder and “Nostalgic Food Blogger” of Betty’s Cook Nook

A Scan Of Mom’s Original Apricot Kolache Filling Recipe

A Scan Of Mom’s Prune Kolache Filling Recipe

A Scan Of Mom’s Cottage Cheese Kolache Filling Recipe

A Scan Of Mom’s Streusel Topping Recipe
lemon springtime cake
Posted: May 13, 2018 Filed under: desserts | Tags: angel food cake mix, butter, confectioner's sugar, egg yolks, food coloring, lemon juice, lemon pudding mix, milk, water Leave a comment

Debuting in my kitchen on Mother’s Day 2018,
this springtime cake recipe is dedicated to all you Moms out there!
Thank you for everything you do…
and for ensuring we never go to bed hungry!
~ ♥ ~
Pucker Up, Cake Lovers
Just before jettisoning to my first official family vacation in over 5 years (insert glad face here) I made this cake. Before I dive into why you should make it, too, I want to share a crazy family story connection with this recipe!
Before leaving for the Texas Coast I was reminded of a list I recalled that was tucked away in my Mom “Betty’s” cookbook. For 7 years I had thought it was a list Mom wrote in preparation for an October trip to the coast to enjoy the temperatures of the beachy, breezy 70s and 80s which is quite delightful after the typical blazing Texas summer.
Since I was reminded of the beachtime list I snapped a few pics of the list (below) and texted them to my Dear Cousin Alison, who is as much a fellow Foodie as one could hope for. She and I texted back and forth while Joe drove me and the Dogs to Port Aransas… somewhere around Refugio, Texas, I had a huge revelation – the list wasn’t for a family vacation, it was preparing for an e-vacuation!
What Chew Talking About, Willis?
I stumbled across the date “10-22-62” that was written off to the side of my Mom’s list and after seeing my Googled search results my heart started beating faster. My family wasn’t about to to go on a joyride trip – they were preparing for the Cuban Missile Crisis! I had heard about the Cuban Missile Crisis before, but I didn’t realize its potential for devastation here on U.S. soil.
Aggressively searching on Google for more clues about this date and it’s significance to San Antonio I stumbled upon a passage from the book A Tale of Three Cities (authored by R. Douglas Brackenridge and published by Trinity University).
“During the Cuban missile crisis in the fall of 1962, students monitored events closely, aware that because of its military bases, San Antonio was a prime target in case of enemy attack. One student wrote, ‘We live in an age in which we have five minutes to rush to a bomb shelter to live. For that is how long it would take for a nuclear missile launched from Cuba to reach San Antonio.’ … The university was preparing shelter areas with minimum provisions in case an emergency should arise.”
Sobering. As a alum of Trinity University, there’s no doubt Mom’s ties to her alma mater rang loud during this scary time. Even more so, I was amazed how – once again – a simple recipe from Mom’s cookbook could unearth so much history and relevancy to my family.
Um, Did You Forget About The Cake?
Of course not! As a self-proclaimed extreme foodie, culinary consumables are always on my mind. So let’s get to it! What I think you’ll love about this cake:
- The checkerboard cake pattern. 50+ years ago alternating yellow and white cake was surely quite a surprise, cleverly “hidden” beneath the lemony frosting.
- Layered pudding cake. Need I say more?
- The tart and sweet taste of the lemon frosting. You can peel off the frosting recipe and make it for cupcakes or any other cake where you want a citrusy lemon appeal.

Foodie Tips
❤ Mom’s Options For The Frosting: 1) Mix lemon juice into 2 packages (7 ounces each) butter-cream style frosting mix or; 2) Make your own delicious Lemon-Butter Frosting compliments of Mom’s recipe that pairs wonderfully with this cake! The instructions below presume we will be making scratch frosting, since that’s how I enjoyed it. The scratch frosting was super-simple to make and the taste was excellent!
❤ Tube pan vs. bundt pan. I didn’t know the difference until I was already into baking this recipe! Luckily my bundt wasn’t extremely fluted and the cake popped right out. But I was panicking that the batter was going to ooze all over my oven as the tube pan holds a little more batter than the typical bundt.
i. Time
Total prep: About 2 hours, including baking, cooling and chilling.
ii. Ingredients
for the cake:
1 package | angel food cake mix
6-8 or so | drops of yellow food coloring
1 package | lemon instant pudding
varies | milk or water (read directions on the pudding package)
for the frosting: (yields 2 ½ cups)
½ cup (1 stick) | butter, softened (my grandmother insisted on Falfurrias)
2 | cage free egg yolks
4 cups (1 pound) | confectioner’s sugar, sifted
3 tablespoons | lemon juice
iii. What to do
for the cake:
0. Preheat your oven to 375°F.
1. While that’s prepping, in a large bowl prepare the cake mix. Spoon half the batter into a second bowl and add about 6-8 drops of yellow food color and stir well; leave the other batter original “white.”
2. Fill an ungreased 10-inch tube pan with alternating spoonfuls of yellow and white batters. Do not stir! I wound up with 3 layers of alternating colored batters in total; yours may vary.
3. Bake your cake mix in your preheated oven about 1 hour, or until done.
4. Remove the cake from the oven, turn the pan upside down onto a wire rack and cool completely.
5. Prepare the instant pudding mix and chill it about 10 minutes to allow it to thicken.

6. Loosen and turn out the cake (mine literally fell out of the pan). Using a large serrated knife to slice the cake into 3 horizontal layers. Spread the pudding between layers leaving the top of the cake plain.
 7. Frost the top and sides of the cake (frosting recipe below).

for the frosting:
1. With a hand mixer cream the butter until soft.
2. Blend in the egg yolks.
3. Add sugar a little at a time and alternate with the lemon juice.
4. Blend until everything is thick and creamy-smooth. The suspense is killing me! Let’s frost the cake and get to it!
Despite my excitement to devour this I was able to wait and chill my cake for 15 minutes or so. This step is totally optional but I like my citrusy cakes chilled and refreshing.
Yields 12-16 servings!
Betty’s Son
Founder and “Nostalgic Food Blogger” of Betty’s Cook Nook
Scans Of My Mom “Betty’s” Original Springtime Cake + Frosting Recipes


Hats Off To You, Springtime Cake
Ready for my Mom’s Cuban Missile evacuation lists?
Here they are followed by a few comments from the “me” of today to yesterday.


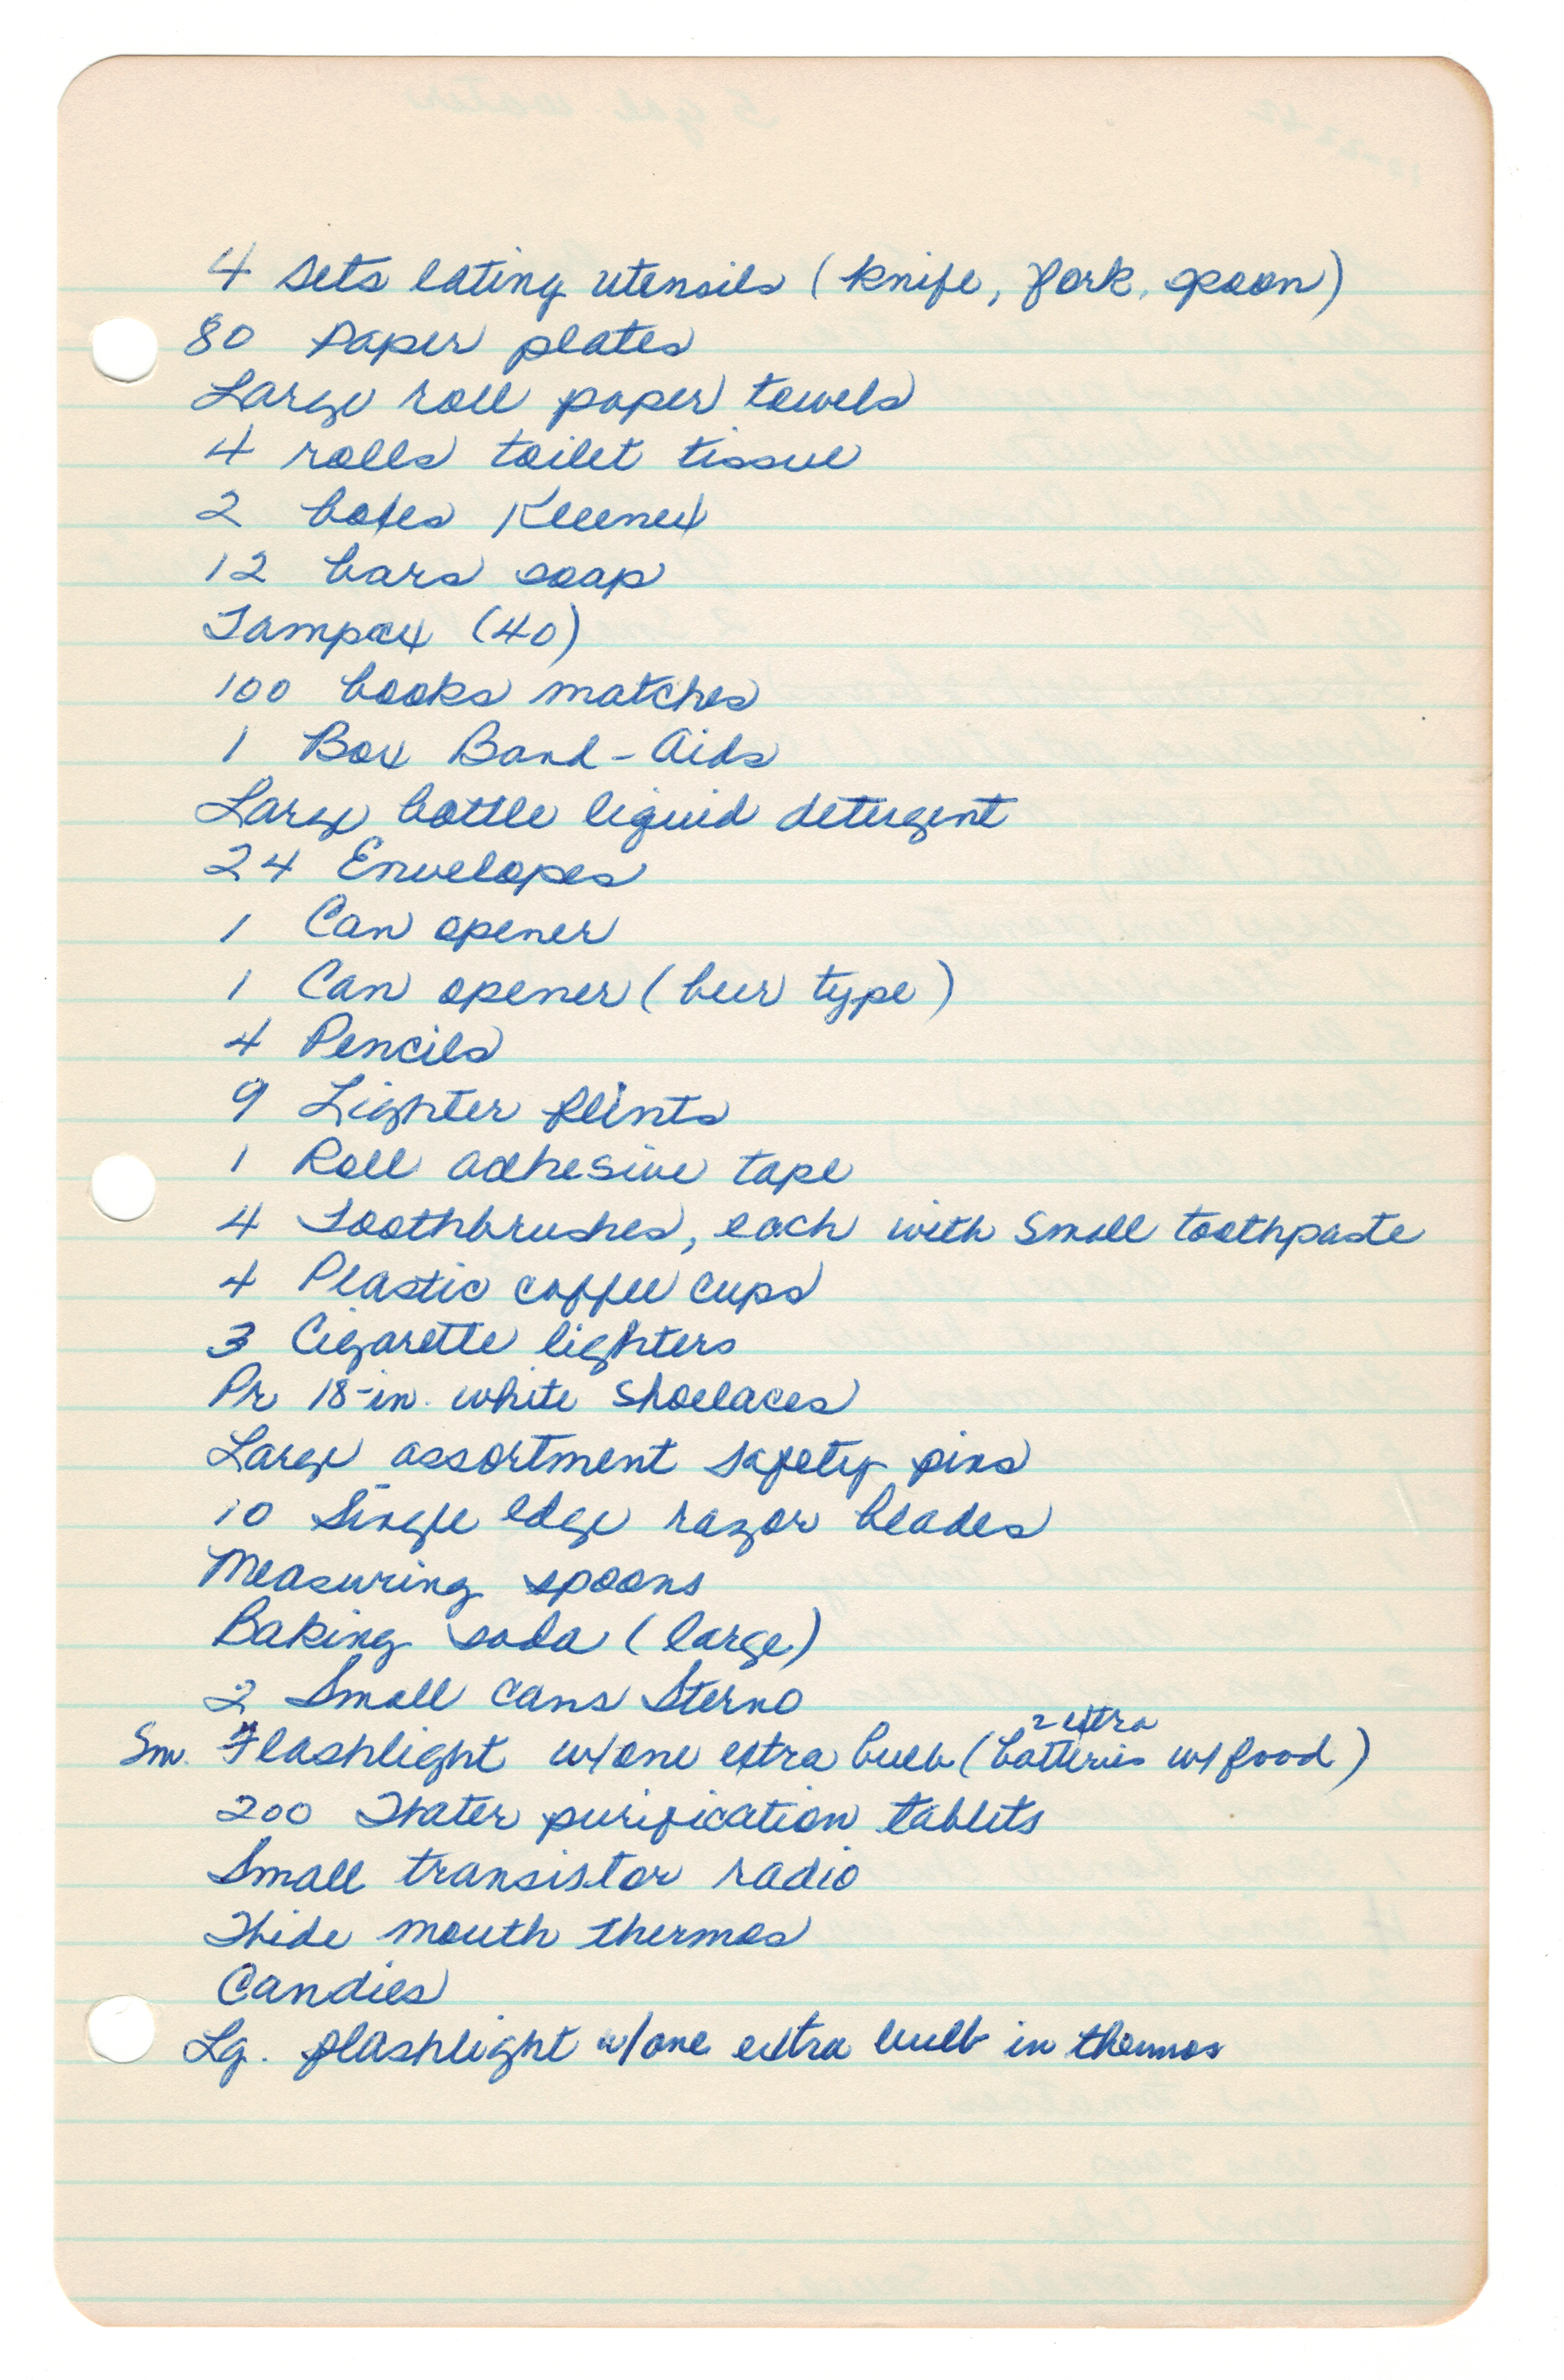


- Pink Baby Quilt – Since Mom and Dad only had two boys I thought this one was interesting. Then I was reminded that ultrasounds didn’t become popular until the 1980s so undoubtedly they received a pink blanket for what turned out to be baby boys. Surprise!
- Snowsuits, Coveralls, and Flannel Shirts? In San Antonio? Alison noted a passage in the “Fallout Protection” book below that explained the wintry coverups: “Young people might be injured more by nuclear radiation than older people. This is because young people are more apt to absorb radioactive elements into their bones and internal organs than are older people.”
- Water (5 Gallons) and Toilet Paper (4 rolls): I found these quantities disproportionate to what I would insist upon – more like 80 rolls of toilet paper and 5 boxes of wine… to get me through the weekend.
- Bonus Reading Below: My Cousin Alison gave me links to so many awesome references about nuclear fallout. I know it’s weird to be posting about them here, but they are a blast from the past, so I’m sharing them.
President JFK’s Cuban Missle Crisis 10-22-62 Address:
A Fallout Shelter Audio Clip:
Fallout Protection: What to Know and Do
New Homeowner Opens Shelter Sealed Since 1961
A Special Treat: Something From the 80s
chicken supreme
Posted: August 27, 2017 Filed under: meats poultry and fish | Tags: butter, chicken breast, egg white, egg yolks, mushrooms, parmesan cheese, pepper, potatoes, salt Leave a comment
With a recipe calling for just a few ingredients, I was quite leery that this dish would delight the tastebuds. Turns out I was in for a chicken supreme surprise!

This is a surprisingly simple dish that pairs well with vegetables or potatoes. As a self-proclaimed carb monster you can likely guess what side I chose! I’m including *at no extra cost to you* the jalapeño mashers recipe I scored from H-E-B because these were really delicious and we’ll be making the mashers again soon. Details below!
For maximum enjoyment speed up the Mr. Bean video below to 8X original speed and let’s get on with the eating of the chicken!
https://gfycat.com/JubilantEvergreenBream
foodie tips
❤ Dining for two? We reduced the portions below to ⅓ and we were fully sa-tis-fied!
❤ Falfurrias butter? Yup! My Grandmother “Nanny” (Betty’s Mom) insisted on it. Don’t disappoint my Nanny!
i. ingredients
6 | small boneless chicken breasts
½ stick | falfurrias brand unsalted butter
to taste | kosher salt and fresh cracked pepper
6 | eggs, whites and yolks separated
¼ cup | parmesan cheese, grated
1 cup | fresh mushrooms, sliced

ii. what to do
1. Flatten the chicken breasts with a cleaver. Joe placed the breasts in cling film and pounded away. Remove the breasts from the film and season them with salt and pepper.
2. In a medium-sized pan over medium-high heat add ½ the butter then the chicken and sauté the breasts five minutes on each side. Set the chicken aside on a plate or platter.

This Is My Chicken Set Aside On A Plate. A Finely Plated Chicken, I Must Say!
3. In the same pan, sauté the fresh mushrooms with the remaining ¼ stick butter. Season with more salt and pepper to taste then set aside.
4. In a medium-sized bowl, beat the egg whites by hand until stiff, but not dry. In a separate bowl beat the egg yolks until thick and lemon-colored. Add the parmesan cheese to the egg yolks. Then gently fold in the egg whites.
5. Place the sautéed chicken breasts in a warmed casserole dish. Cover the breasts with the sautéed mushroom mixture and pour the egg mixture on top.
6. Place your chicken supreme in a 450°F degree oven for 10 minutes until puffed and slightly brown.
Yields 2-3 servings, depending on the size of your chicken breasts!
Betty’s Son
Founder and “Nostalgic Food Blogger” of Betty’s Cook Nook

A Scan Of Mom’s Original Recipe For Chicken Supreme – Could The Recipe Headline Indicate This Is From Susan Lucci’s Kitchen?

BONUS RECIPE : Jalapeño Mashers
While this is not one of my Mom “Betty’s” recipes I think she would love it as much as I did. The cheesy jalapeño ‘kick’ pairs well with chicken supreme. So here goes:
4 | large potatoes (we used russets)
½ stick | butter
1 cup | heavy cream
½ teaspoon | salt (to taste)
½ cup | robert’s reserve jalapeño pepper dip
handful | cheese (optional)
handful | fresh jalapeño, diced
Peel the potatoes and cut them into chunks. Boil the potatoes in chicken stock or water until “fork tender.”
Mash the potatoes to desired consistency and add the butter and cream. Whip the potatoes with a mixer or spatula (we used a mixer). Add Roberts Reserve Jalapeño Dip and stir.
Transfer to a baking dish, top with grated cheese and bake at 375°F for about 10 minutes. Garnish with finely diced fresh jalapeño! Enjoy!

A Scan Of The Jalapeño Mashers Recipe I Scored At H-E-B Round Rock
baked swiss cauliflower
Posted: August 28, 2014 Filed under: sides | Tags: bread crumbs, butter, cauliflower, egg yolks, half and half, nutmeg, pepper, salt, swiss cheese Leave a comment
Move Over, Green Bean Casserole…
…there’s a hot, new dish in town and it’s this Baked Swiss Cauliflower recipe!
Before reading the ingredients for this dish I had serious self doubt about how many spoonfuls of this stuff would make it past my proverbial piehole. One plate later and I was ready for a refill.
And s t r e t c h pants!
Beth Calkins of Nashville, Tennessee – I don’t know anything about your life outside this recipe but it must have been a kinder, gentler place where sweet, sweet swiss cauliflower rained from the heavens!
Lucky for me my Mom could read between the lines; she knew that anything with cheese and butter becomes a fast, fond feeding moment destined to be recreated.
Ding! Ding! Ding! This just in – come Thanksgiving 2014 this Baked Swiss Cauliflower recipe has secured a guaranteed place at our Thanksgiving table.
Foodie Tips ~
♥ New to Betty’s Cook Nook? “Butter” is shorthand for “Falfurrias Brand Butter.” It’s what my Grandmother “Nanny” loved near and dear, so it’s naturally the only butter allowed past the threshold.
♥ Don’t discard the 3 egg whites (below)! I made an egg white omelette the morning after I made this dish and I became a better person because of it. Whoops. Did I say better? I meant butter … and cheese! They both made my egg white omelette their new BFF, along with some chopped green onions. Just sayin’.
i. ingredients
1 | large head of cauliflower
½ cup | bread crumbs
2 ¾ cups | swiss cheese, shredded
1 ½ cups | half and half
3 | egg yolks, beaten
¼ teaspoon | ground nutmeg
½ teaspoon | salt
¼ teaspoon | fresh cracked pepper
¼ cup | melted falfurrias brand butter

ii. what to do
0. Preheat oven to 350°F.
1. Wash the cauliflower and discard the green leaves. Break cauliflower into flowerets and place in a medium-sized pot.
2. Cook, covered, 10 minutes in a small amount of boiling salted water. Drain.

3. Place the cooked cauliflower in a buttered 1 ½-quart shallow baking dish. Combine the remaining ingredients – except the butter – and pour over the cauliflower. Drizzle the melter butter over top.
4. Bake for 15-20 minutes or until the top is golden brown.
Yields about 6 servings.
Here’s a scan of Mom’s original recipe!


