lemon springtime cake
Posted: May 13, 2018 Filed under: desserts | Tags: angel food cake mix, butter, confectioner's sugar, egg yolks, food coloring, lemon juice, lemon pudding mix, milk, water Leave a comment

Debuting in my kitchen on Mother’s Day 2018,
this springtime cake recipe is dedicated to all you Moms out there!
Thank you for everything you do…
and for ensuring we never go to bed hungry!
~ ♥ ~
Pucker Up, Cake Lovers
Just before jettisoning to my first official family vacation in over 5 years (insert glad face here) I made this cake. Before I dive into why you should make it, too, I want to share a crazy family story connection with this recipe!
Before leaving for the Texas Coast I was reminded of a list I recalled that was tucked away in my Mom “Betty’s” cookbook. For 7 years I had thought it was a list Mom wrote in preparation for an October trip to the coast to enjoy the temperatures of the beachy, breezy 70s and 80s which is quite delightful after the typical blazing Texas summer.
Since I was reminded of the beachtime list I snapped a few pics of the list (below) and texted them to my Dear Cousin Alison, who is as much a fellow Foodie as one could hope for. She and I texted back and forth while Joe drove me and the Dogs to Port Aransas… somewhere around Refugio, Texas, I had a huge revelation – the list wasn’t for a family vacation, it was preparing for an e-vacuation!
What Chew Talking About, Willis?
I stumbled across the date “10-22-62” that was written off to the side of my Mom’s list and after seeing my Googled search results my heart started beating faster. My family wasn’t about to to go on a joyride trip – they were preparing for the Cuban Missile Crisis! I had heard about the Cuban Missile Crisis before, but I didn’t realize its potential for devastation here on U.S. soil.
Aggressively searching on Google for more clues about this date and it’s significance to San Antonio I stumbled upon a passage from the book A Tale of Three Cities (authored by R. Douglas Brackenridge and published by Trinity University).
“During the Cuban missile crisis in the fall of 1962, students monitored events closely, aware that because of its military bases, San Antonio was a prime target in case of enemy attack. One student wrote, ‘We live in an age in which we have five minutes to rush to a bomb shelter to live. For that is how long it would take for a nuclear missile launched from Cuba to reach San Antonio.’ … The university was preparing shelter areas with minimum provisions in case an emergency should arise.”
Sobering. As a alum of Trinity University, there’s no doubt Mom’s ties to her alma mater rang loud during this scary time. Even more so, I was amazed how – once again – a simple recipe from Mom’s cookbook could unearth so much history and relevancy to my family.
Um, Did You Forget About The Cake?
Of course not! As a self-proclaimed extreme foodie, culinary consumables are always on my mind. So let’s get to it! What I think you’ll love about this cake:
- The checkerboard cake pattern. 50+ years ago alternating yellow and white cake was surely quite a surprise, cleverly “hidden” beneath the lemony frosting.
- Layered pudding cake. Need I say more?
- The tart and sweet taste of the lemon frosting. You can peel off the frosting recipe and make it for cupcakes or any other cake where you want a citrusy lemon appeal.


Foodie Tips
❤ Mom’s Options For The Frosting: 1) Mix lemon juice into 2 packages (7 ounces each) butter-cream style frosting mix or; 2) Make your own delicious Lemon-Butter Frosting compliments of Mom’s recipe that pairs wonderfully with this cake! The instructions below presume we will be making scratch frosting, since that’s how I enjoyed it. The scratch frosting was super-simple to make and the taste was excellent!
❤ Tube pan vs. bundt pan. I didn’t know the difference until I was already into baking this recipe! Luckily my bundt wasn’t extremely fluted and the cake popped right out. But I was panicking that the batter was going to ooze all over my oven as the tube pan holds a little more batter than the typical bundt.
i. Time
Total prep: About 2 hours, including baking, cooling and chilling.
ii. Ingredients
for the cake:
1 package | angel food cake mix
6-8 or so | drops of yellow food coloring
1 package | lemon instant pudding
varies | milk or water (read directions on the pudding package)
for the frosting: (yields 2 ½ cups)
½ cup (1 stick) | butter, softened (my grandmother insisted on Falfurrias)
2 | cage free egg yolks
4 cups (1 pound) | confectioner’s sugar, sifted
3 tablespoons | lemon juice
iii. What to do
for the cake:
0. Preheat your oven to 375°F.
1. While that’s prepping, in a large bowl prepare the cake mix. Spoon half the batter into a second bowl and add about 6-8 drops of yellow food color and stir well; leave the other batter original “white.”
2. Fill an ungreased 10-inch tube pan with alternating spoonfuls of yellow and white batters. Do not stir! I wound up with 3 layers of alternating colored batters in total; yours may vary.
3. Bake your cake mix in your preheated oven about 1 hour, or until done.
4. Remove the cake from the oven, turn the pan upside down onto a wire rack and cool completely.
5. Prepare the instant pudding mix and chill it about 10 minutes to allow it to thicken.

6. Loosen and turn out the cake (mine literally fell out of the pan). Using a large serrated knife to slice the cake into 3 horizontal layers. Spread the pudding between layers leaving the top of the cake plain.
 7. Frost the top and sides of the cake (frosting recipe below).

for the frosting:
1. With a hand mixer cream the butter until soft.
2. Blend in the egg yolks.
3. Add sugar a little at a time and alternate with the lemon juice.
4. Blend until everything is thick and creamy-smooth. The suspense is killing me! Let’s frost the cake and get to it!
Despite my excitement to devour this I was able to wait and chill my cake for 15 minutes or so. This step is totally optional but I like my citrusy cakes chilled and refreshing.
Yields 12-16 servings!
Betty’s Son
Founder and “Nostalgic Food Blogger” of Betty’s Cook Nook
Scans Of My Mom “Betty’s” Original Springtime Cake + Frosting Recipes


Hats Off To You, Springtime Cake
Ready for my Mom’s Cuban Missile evacuation lists?
Here they are followed by a few comments from the “me” of today to yesterday.


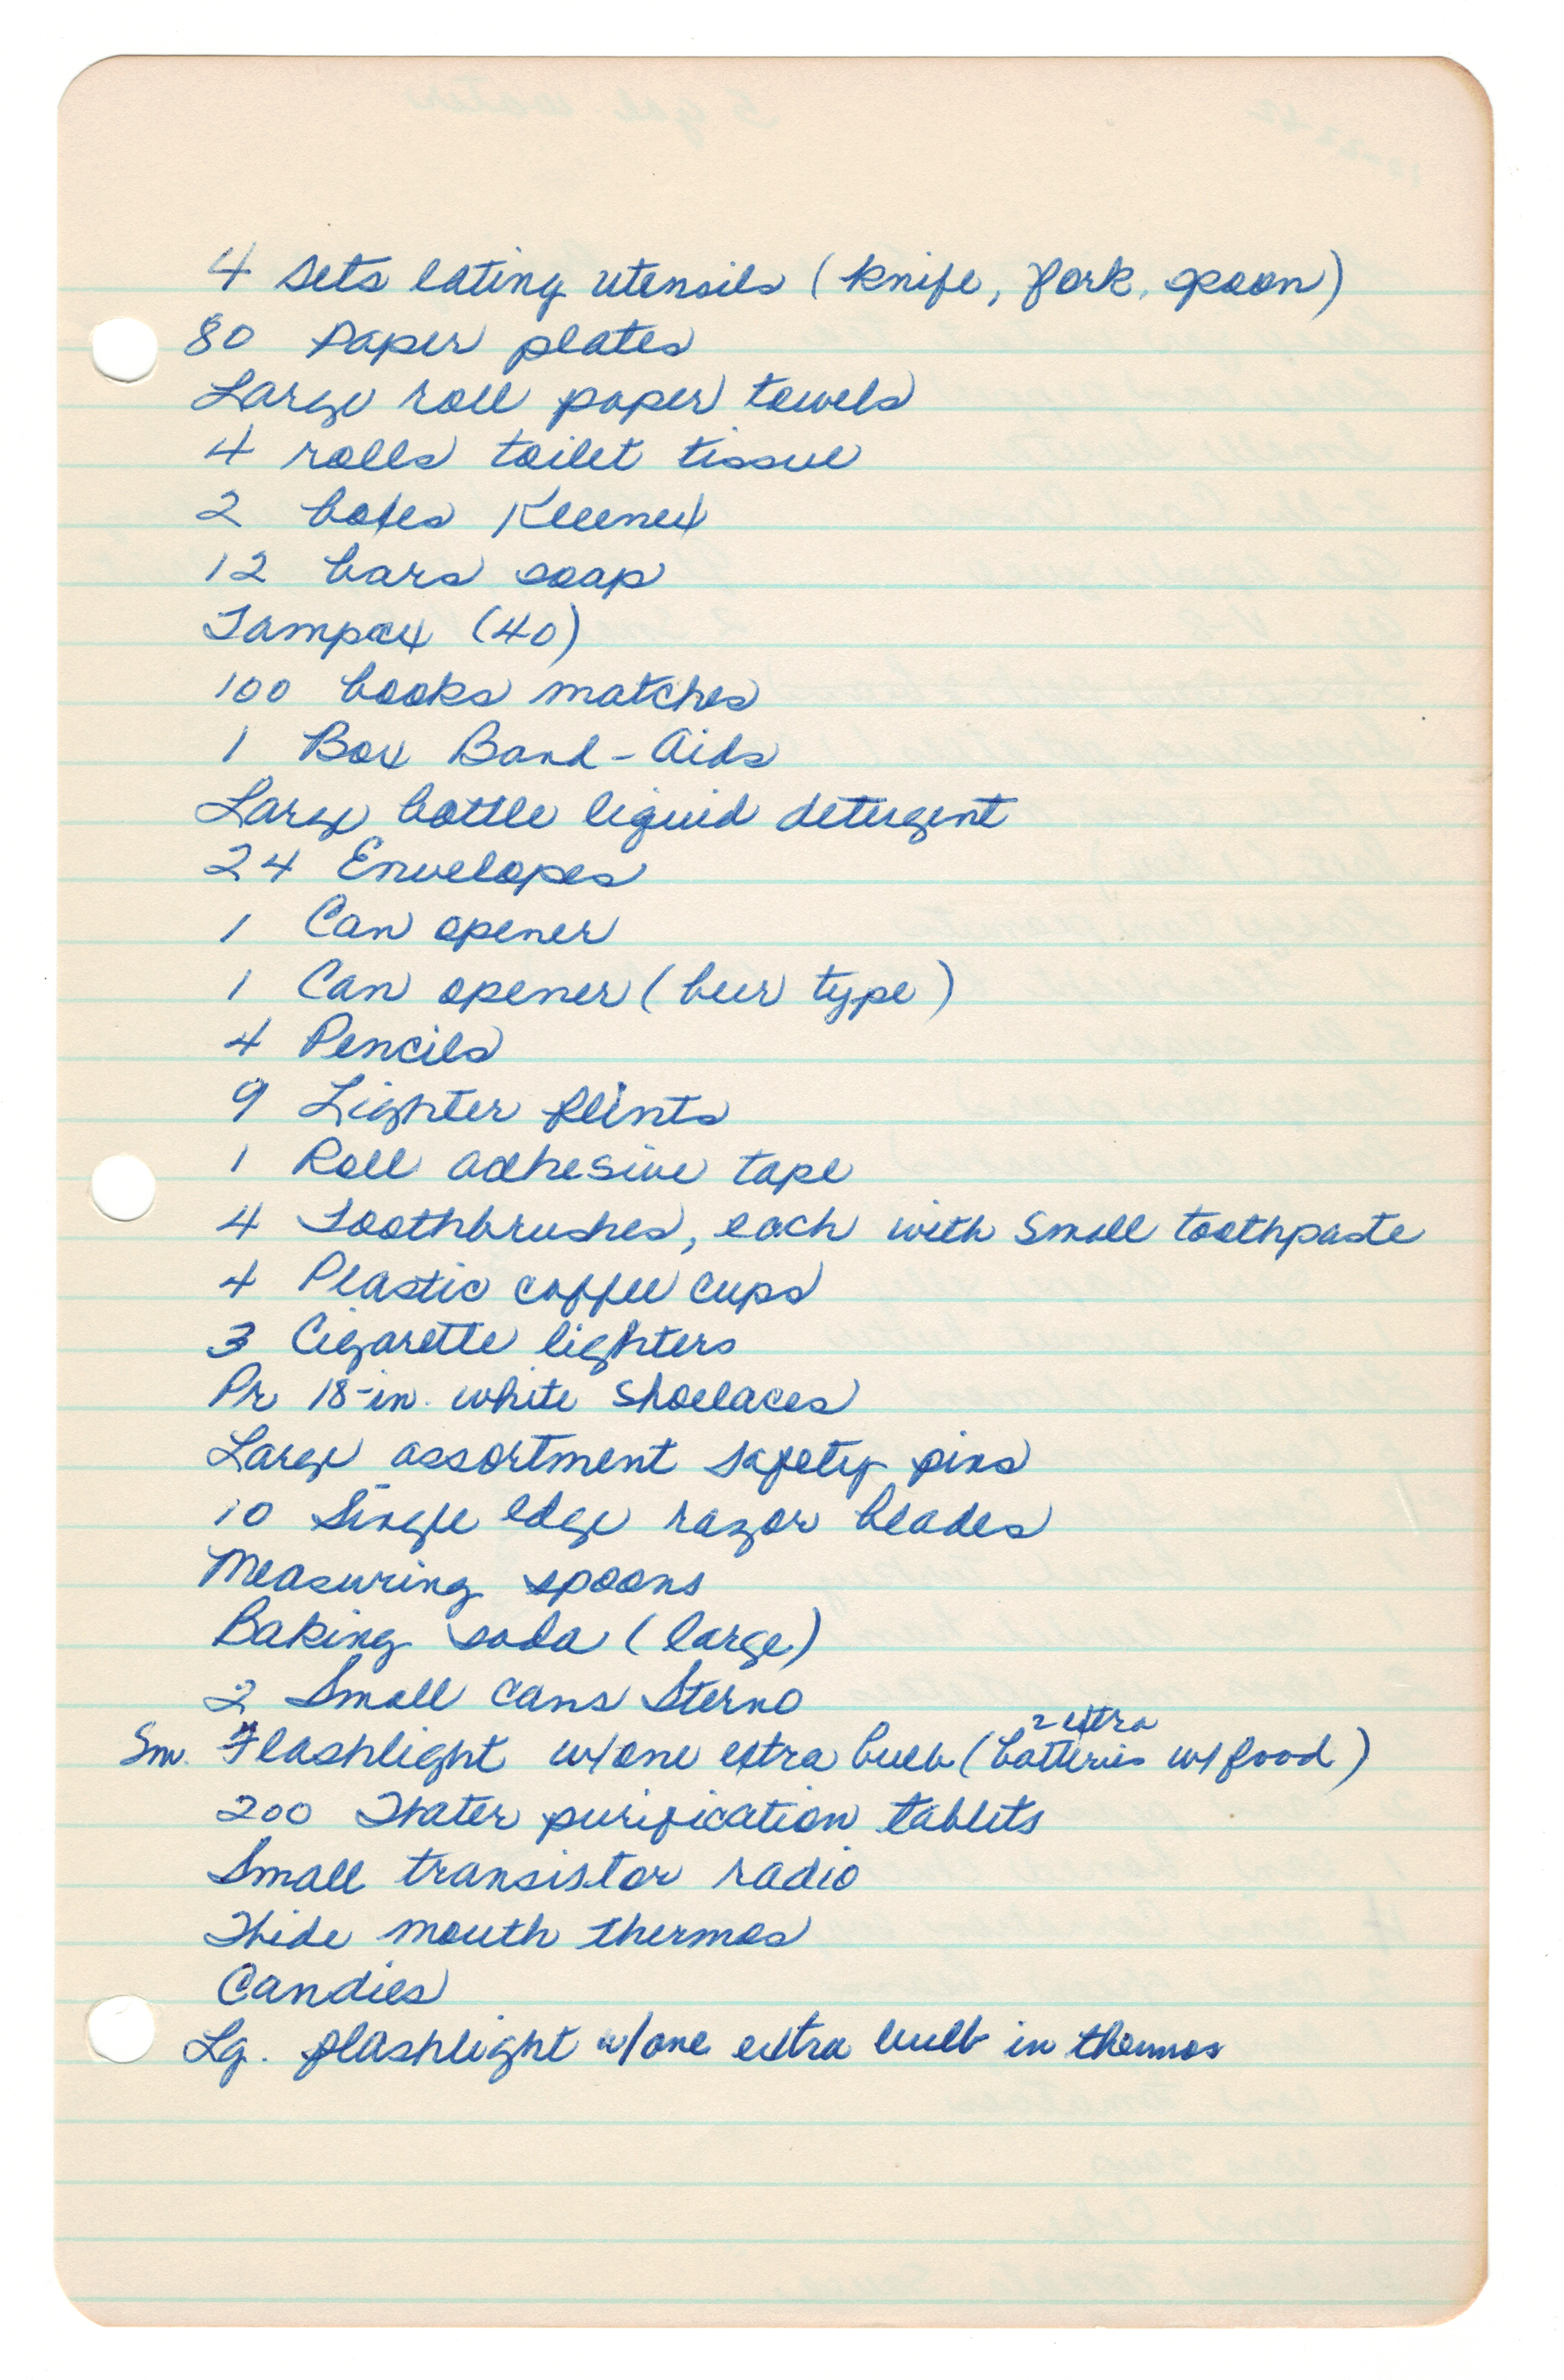


- Pink Baby Quilt – Since Mom and Dad only had two boys I thought this one was interesting. Then I was reminded that ultrasounds didn’t become popular until the 1980s so undoubtedly they received a pink blanket for what turned out to be baby boys. Surprise!
- Snowsuits, Coveralls, and Flannel Shirts? In San Antonio? Alison noted a passage in the “Fallout Protection” book below that explained the wintry coverups: “Young people might be injured more by nuclear radiation than older people. This is because young people are more apt to absorb radioactive elements into their bones and internal organs than are older people.”
- Water (5 Gallons) and Toilet Paper (4 rolls): I found these quantities disproportionate to what I would insist upon – more like 80 rolls of toilet paper and 5 boxes of wine… to get me through the weekend.
- Bonus Reading Below: My Cousin Alison gave me links to so many awesome references about nuclear fallout. I know it’s weird to be posting about them here, but they are a blast from the past, so I’m sharing them.
President JFK’s Cuban Missle Crisis 10-22-62 Address:
A Fallout Shelter Audio Clip:
Fallout Protection: What to Know and Do
New Homeowner Opens Shelter Sealed Since 1961
A Special Treat: Something From the 80s
magic salt crystal garden
Posted: July 9, 2016 Filed under: gardening tips, other stuff | Tags: food coloring, salt Leave a comment A Recipe With No Name
Since recently sharing out tips from the gardening section of Mom’s cookbook I’ve realized that you never know where a surprise might be hiding in her treasure chest of recipes. This recipe had no name but reading the instructions peeked my curiosity so I decided to dive in deep and make it.
I didn’t know what “bluing” was but after a few quick online clicks I landed at this site that solved the mystery. We’re gonna make our own magic crystal garden!
Flashback Fun Days
Back in my day, “fun” wouldn’t have cut it by today’s standards.
My rock tumbler was about as much fun as watching paint dry or what’s even more exciting … watching a real rock sit still. Don’t even get me started about Pet Rocks. My G.I. Joe helicopter was attached to its clunky battery pack with a wire, not bluetooth. #NoRealFun. Board games were pretty much that – boring! There were days when it seemed like sitting and staring at the sun was just as fun, just as Grumpy Old Man would say! Let’s have a laugh:
There were a few truly fun things that broke through the mundane sea of insanity. In walks magical fun with the likes of Sea Monkeys, Ant Farms and the super melty fun of Shrinky Dinks – these were some of my childhood favorites.
I do remember seeing my first crystal garden – it wasn’t mine but it was just as cool.
I read on Mrs. Stewart’s liquid bluing website that making salt gardens became popular during the Great Depression. So much so the creations are often referred to as a depression flower or a coal garden. Good times! Let’s get to crystal gardening!
 tips ~
❤ You’ll want to secure your bluing before making this garden. It was hard to find it here in Austin so I wound up ordering a 3-pack via Amazon … or you can order it directly from Mrs. Stewart’s website. I’m going to give it a “go” in the laundry as well!
❤ While Mom’s original recipe calls for brick or clay pot, you can use anything porous including coal, coke (fuel), charcoal, or pieces of sponge. I decided to go the clay pot route and thought I’d try my hand at fashioning a faux cake out of a mini pot and saucer I found. So I didn’t need the sponge cut into 4 pieces noted below, which were used for blotting.
❤ Do not use metal or tin containers – Do use glass or plastic!
❤ Do not touch your crystal formation or it will crumble.

i. ingredients
various | pieces of brick, clay pot, or sponge (anything porous)
1 | sponge, cut into 4 pieces (optional – see tip above)
assorted colors | food coloring
4 tablespoons | bluing
4 tablespoons | ammonia
4 tablespoons | distilled water
4 tablespoons | iodized salt
1 | glass or plastic bowl – the flatter the easier to enjoy
ii. what to do
Step 1. If you’re using brick, blot it with a sponge to clean it. Otherwise, skip to Step 2.
Step 2. Drop food coloring onto your base – this will create the colors!
Step 3. Mix together the bluing, ammonia and distilled water to make your solution. Pour this solution over your base material. Sprinkle your creation with salt. Mom’s recipe said it would take 6 hours to grow but I saw results in about 20 minutes.
Step 4. To keep your garden growing you can add a little more ammonia. I read on Mrs. Stewart’s website to add more of the food coloring, solution and salt on Day 3, but experiment and adjust to your preference.
Next time I’m going to use plain ammonia instead of lemon-scented ammonia which is all I could find at HEB. My crystal garden cupcake was a little “flat” side. I’ll make sure and post updated pictures! I hope you enjoy making your own garden as much as I did!
~ Patrick
Betty’s Son
Founder and “Nostalgic Food Blogger” of Betty’s Cook Nook

A scan of Mom’s original recipe for making a crystal garden!

