nutmeg cake
Posted: December 31, 2023 Filed under: desserts | Tags: baking powder, baking soda, brown sugar, butter, buttermilk, coconut, eggs, flour, light cream, nutmeg, salt, sugar Leave a comment The Spice Of Life
Whether it’s sprinkled on top of your favorite wintertime drink, added to pies or cakes, or found in the form of a fancy sports move, nutmeg makes pretty much any time a special time.
Known for its warm, nutty, earthy, and slightly sweet taste, nutmeg is often found palling around with its familiar besties, cinnamon, clove, pumpkin pie spice, and allspice. Folks often say nutmeg “smells like Christmas,” and it’s not surprising that quite a few of my Mom “Betty’s” recipes call for this ingredient. From fondue to meatballs, quiche, and sweets, you can find nutmeg recipes with the ingredient search area at right (in desktop view).
Foodie Tips
❤ Buttermilk is fermented milk and if you don’t have buttermilk you can substitute it with sour milk. Sour milk? This term always throws me but if you’re in a pinch you can make “soured” milk – this article and video are quite surprising!
❤ No light cream on hand? You can substitute with a mixture of equal parts milk and heavy cream. Other options.
❤ What does nutmeg have to do with sports? My culinary skills outweigh my sports skills and this article helped me connect the two.
i. Time
About an hour
ii. Ingredients
for the cake:
½ cup | butter (my Grandmother “Nanny” insisted on Falfurrias brand butter)
1 ⅓ cups | sugar
3 | eggs
2 cups | sifted all-purpose flour
1 teaspoon | baking powder
1 teaspoon | baking soda
2 teaspoons | nutmeg
½ teaspoon | salt
1 cup | buttermilk or sour milk
for the topping:
6 tablespoons | more butter
¼ cup | light cream (Coffee mate “Original” flavor works great)
1 cup | brown sugar
½ cup | flaked coconut

3 Out Of 3 Elves Agree Nutmeg Cake Makes The Holidays Bright
iii. What To Do
1. In a mixing bowl or KitchenAid, cream together the butter and sugar until they are light and fluffy.
2. Add the eggs one at a time, beating well after each addition.
3. In a separate bowl sift together the flour, baking powder, baking soda, nutmeg, and salt. Add this to the creamed mixture with buttermilk, beating well after each addition.
4. Now is a good time to preheat your oven to 375°F.
5. Turn the batter into a greased and floured 13 x 9 x 2-inch baking pan.
6. Bake at 375°F for 25 minutes or until done.
7. Let’s make the topping. In a medium pan combine the 6 tablespoons butter, the light cream and brown sugar. Place over medium-high heat and bring it to a boil.
8. Pour the mixture over the nutmeg cake. Top with the flaked coconut and return the cake to the oven to bake for 5 minutes.
This is delicious served warm!
Yield: 8-12+ Servings, depending on size of your appetite and your willingness to share
Betty’s Son
Founder and “Nostalgic Food Blogger” of Betty’s Cook Nook

An Original Scan Of Mom’s Nutmeg Cake Recipe | Better Homes And Gardens, March 1969
Time Warp: Click on the vintage advertisements below from the 1930s – 1960s… all incorporating nutmeg!


11/30/21Presidente Brandy
peanut brittle
Posted: December 7, 2022 Filed under: desserts, The Best Of The Best Recipes | Tags: baking soda, butter, corn syrup, peanuts, salt, sugar, vanilla Leave a comment
A Foodie Fail Recovery
After I worked my way into the details of this recipe, the mere fact I needed to have a candy thermometer literally had me shaking in the corner, full-body-wrapped in my burrito blankey. Ever since my prior candy thermometer foodie fails in the form of red candied apples and oh, fudge, I knew a culinary disaster wasn’t just around the corner, it was lurking for me!
Maybe it was the wine or the lack of patience… but I decided to dive 100% into this recipe without a candy thermometer. I threw caution to the wind! And I was surprised this was made entirely in the microwave… and even more surprised it was entirely devoured *and* delicious!
Congrats to the folks at Southern Living Magazine for this recipe (circa 1980), landing this in “The Best Of The Best Recipes” category here at Betty’s Cook Nook!
Foodie Tips
❤ I’m pretty sure with the advancement in microwave wattage since this recipe was originally published that modern microwaves don’t take as much time as they used to. That being said, try the mixture on the lower side of things and add more time if you need to. I cooked mine for 8 minutes and at one point I thought I burned the peanut brittle but it all turned out AOK. Next time I’m going to go for 7.5 minutes. And there will be a next time!
❤ You might be a little intimidated by the sticky, gooey brittle clean-up. This ain’t my first culinary rodeo and I knew my hot tap water would take care of things – and it did! Just let it soak a bit and the sugary brittle concoction will melt all your worries away!
i. Time
About 5 minutes prep and 10 minutes for microwaving and 30 minutes for cooling.
ii. Ingredients
1 cup | sugar
½ cup | light corn syrup
1 ½ cups | raw peanuts, unsalted
¼ teaspoon | salt
1 tablespoon | butter
1 teaspoon | vanilla extract
1 teaspoon | baking soda
 iii. What To Do
1. In a 2.5-quart casserole combine sugar, corn syrup, raw peanuts, and salt.
2. Microwave on high for 7-9 minutes until the mixture is light brown. The mixture gets boiling hot so please ensure your casserole dish is microwave friendly and that you use pot holders when handling the hot dish.
3. While the mixture is microwaving, now is a good time to butter your 9″ x 13″ cooking sheet.
 4. Remove the sugary mixture from the microwave and add the butter and vanilla, mixing them in well. You’ll want to work quickly so the mixture doesn’t start cooling down.
5. Microwave on high for 1 minute or until the mixture reaches hard crack stage (about 300°F). Again, I didn’t use a candy thermometer and the end result was amazing.
6. Remove the molten brittle from the microwave and sprinkle the baking soda on top of the brittle mixture and mix things together.
7. Pour the hot mixture onto a 9″ x 13″ buttered cooking sheet, spreading thinly. I used a wide metal spatula to help press the brittle flat. Don’t worry about irregularly-shaped edges – this is one of the fun characteristics of homemade brittle.
7. Let cool for about 30 minutes or more, then break into pieces.

Santa Agrees: This Peanut Brittle Makes For A Merry Holiday
Yield: About 1 pound.
Betty’s Son
Founder and “Nostalgic Food Blogger” of Betty’s Cook Nook

A Scan Of Mom’s Recipe Clipping From Southern Living Magazine Circa 1980
11/30/21
apple cream coffee cake
Posted: September 25, 2022 Filed under: breakfast, desserts | Tags: apple, baking powder, baking soda, cinnamon, eggs, flour, margarine, salt, sour cream, sugar, walnuts Leave a comment
The Taste Of Fall
As we round out the year my senses automatically turn to fall.
There’s no better way to celebrate crisp fall mornings than with a slice of warm, cinnamony coffee cake. Walnuts, sliced apples, and sour cream will make this a memorable way to start the day.
I can see why my Mom, “Betty”, tucked this recipe in her cookbook – it’s definitely a keeper!
Foodie Tips
❤ If you follow this blog you’ll know I have an utter appreciation for butter. My grandmother “Nanny” insisted on Falfurrias brand butter, which you will see on many of the recipes here at Betty’s Cook Nook. I opted to use margarine for this recipe despite my “bold for butter” instinct. You can read more about some of the differences between margarine and butter in this WebMD article.
❤ You’ll likely want to have some melted butter (or margarine) at the ready. Drizzling some on top of the warm coffee cake just before serving is highly recommended!
i. Time
Prep: About 25 minutes prep and 40 minutes for baking.
 ii. Ingredients
½ cup | walnuts, chopped
2 teaspoons | cinnamon
1 ½ cups | sugar, reserved into ½ cup and 1 cup
½ cup | margarine, softened
2 | eggs (pasture raised a plus)
2 cups | flour
1 teaspoon | baking powder
½ teaspoon | salt
1 teaspoon | baking soda
1 cup | sour cream
1 large | apple, cored, pared, and thinly sliced (I went with granny smith)
iii. What To Do
1. In bowl #1: In a small/medium bowl mix walnuts, cinnamon, and ½ cup sugar. Set aside.
2. In bowl #2: In a medium/large bowl sift the 2 cups of flour. Next add the baking powder, salt and baking soda. Resift everything together.
3. In bowl #3: In a medium/large bowl or KitchenAid bowl cream together until fluffy the margarine and the remaining 1 cup of sugar. Beat in the eggs one at a time until everything is well blended.
4. Into bowl #3: In alternating batches beat well after each addition add some of the sifted dry ingredients to the creamed margarine-sugar mixture, then add some of the sour cream. Keep alternating the batches ending with the dry ingredients.
5. Preheat your oven to 375°F.
6. Grease a cake pan and set it aside.
7. Prepare your apple: coring, paring, and thinly slicing it. I realized while I was preparing this blog post I forgot to remove the apple skin and in all honesty, I didn’t mind the peel at all. On my next “go” of this recipe, I’ll try paring as it will likely result in a softer cake.

8. Spread half of the batter from step 4 into the prepared cake pan. Top the batter with the apples and half of the walnut mixture. Add the remaining batter on top and sprinkle with the remaining walnut mixture.
 9. Bake at 375°F for about 40 minutes, or until the coffee cake is done. Remove from oven to cool a bit. I enjoy this best warm but I tried leftovers from the fridge, which did not disappoint.

Yield: About 12 servings.
Betty’s Son
Founder and “Nostalgic Food Blogger” of Betty’s Cook Nook

A Scan Of Mom’s Original Coffee Cake Recipe
11/30/21
peanut butter slice-and-bake cookies
Posted: September 30, 2021 Filed under: desserts | Tags: baking soda, corn syrup, flour, milk, peanut butter, salt, shortening, sugar Leave a comment The Cookies With A Twist
This recipe hails from the August 1982 issue of Southern Living, so it’s been patiently waiting in Mom’s cookbook for almost 40 years. I had seen the recipe many times flipping through my Mom’s cookbook, but “slice and bake” never really motivated me to explore more… until I later had a hankering for peanut butter and then I found myself headed to the store to get some fresh milk.
This recipe was surprising for a couple of reasons: 1) “Slice and bake.” The bake part threw me because you *don’t* bake these in your oven – you nuke them in your microwave! Making cookies in the microwave is a new one for me but not surprising given that the microwave was a rage making its debut in most American kitchens in the late 1970s. 2) The end result tasted like a homemade nutter butter cookie which was one of my favorites growing up in the 70s and 80s. Enjoy some vintage nutter butter memories below!
I was quite leery that these cookies would turn out great, but boy they sure did, and after the final schmear of peanut butter tucked between two homemade cookies I was thinking I had just made a fresh homemade home run nutter butter cookie sandwich!
Foodie Tips
❤ You can reduce the recipe ingredients by half; we were on a diet that week but it didn’t stop me from diving in! We wrapped and stored some of the remaining dough in the fridge for a couple of days and it lasted just fine.
❤ If you’re in a hurry to dive in you can chill the “baked” cookies in your fridge ~10 minutes to reduce the on counter cooling time. I did this and the end result was surprisingly crunchy.
❤ I laughed when I saw instructions to manually turn the cookies. We are lucky to live in a time when the microwave does the turning for us! I was also curious if these might do well in an air fryer and will try that on the next adventure with this recipe.
i. Time
Total prep: About 3.5 hours, including a 2-3 hour chill timeout in the fridge.
ii. Ingredients
1 ¾ cups | all-purpose flour
½ cup | sugar
½ teaspoon | baking soda
¼ teaspoon | salt
½ cup | shortening
¾ cup (or more) | creamy peanut butter, divided
¼ cup | light corn syrup
1 tablespoon | milk
 iii. What To Do
1. In a medium-sized bowl combine the flour, sugar, baking soda, and salt. With a pastry cutter (or if you don’t have one try a KitchenAid stand mixer) cut in the shortening and ½ cup of the peanut butter until the mixture resembles a coarse meal. Stir in the corn syrup and the milk.
 2. Shape the dough into a long roll, about 2 inches in diameter. Wrap the roll in waxed paper and chill it in the fridge 2 to 3 hours, or until firm.
 3. Unwrap the roll and cut the dough into ¼ inch slices. Place 6 slices at a time on a wax paper-lined plate, arranging them in a ring.
4. Microwave the slices at medium heat (50% power) for 2 to 4 minutes or until the cookies are dry on the surface. If you don’t have a rotating microwave dish, manually rotate the dish at 1-minute intervals to promote “even baking.”
5. Slide/transfer the wax paper with the cookies from the oven onto your kitchen counter and let them cool for 2 minutes. Remove the cookies from the wax paper and place them on a wire rack to completely cool. Repeat the procedure with the remaining dough.
 6. Here’s the magical part: spread half the cookies with a schmear of peanut butter. I was generous with my schmear! Top with a remaining cookie slice on each to form your cookie sandwich.
Yield: About 2 dozen.
Betty’s Son
Founder and “Nostalgic Food Blogger” of Betty’s Cook Nook
Let’s have a peek at some vintage ads:


A Scan Of Mom’s Original Slice And Bake Cookie Recipe Clipping
mrs. copple’s banana bread
Posted: April 20, 2020 Filed under: breakfast, desserts | Tags: baking powder, baking soda, banana, butter, cream cheese, eggs, flour, lemon juice, salt, sugar 6 Comments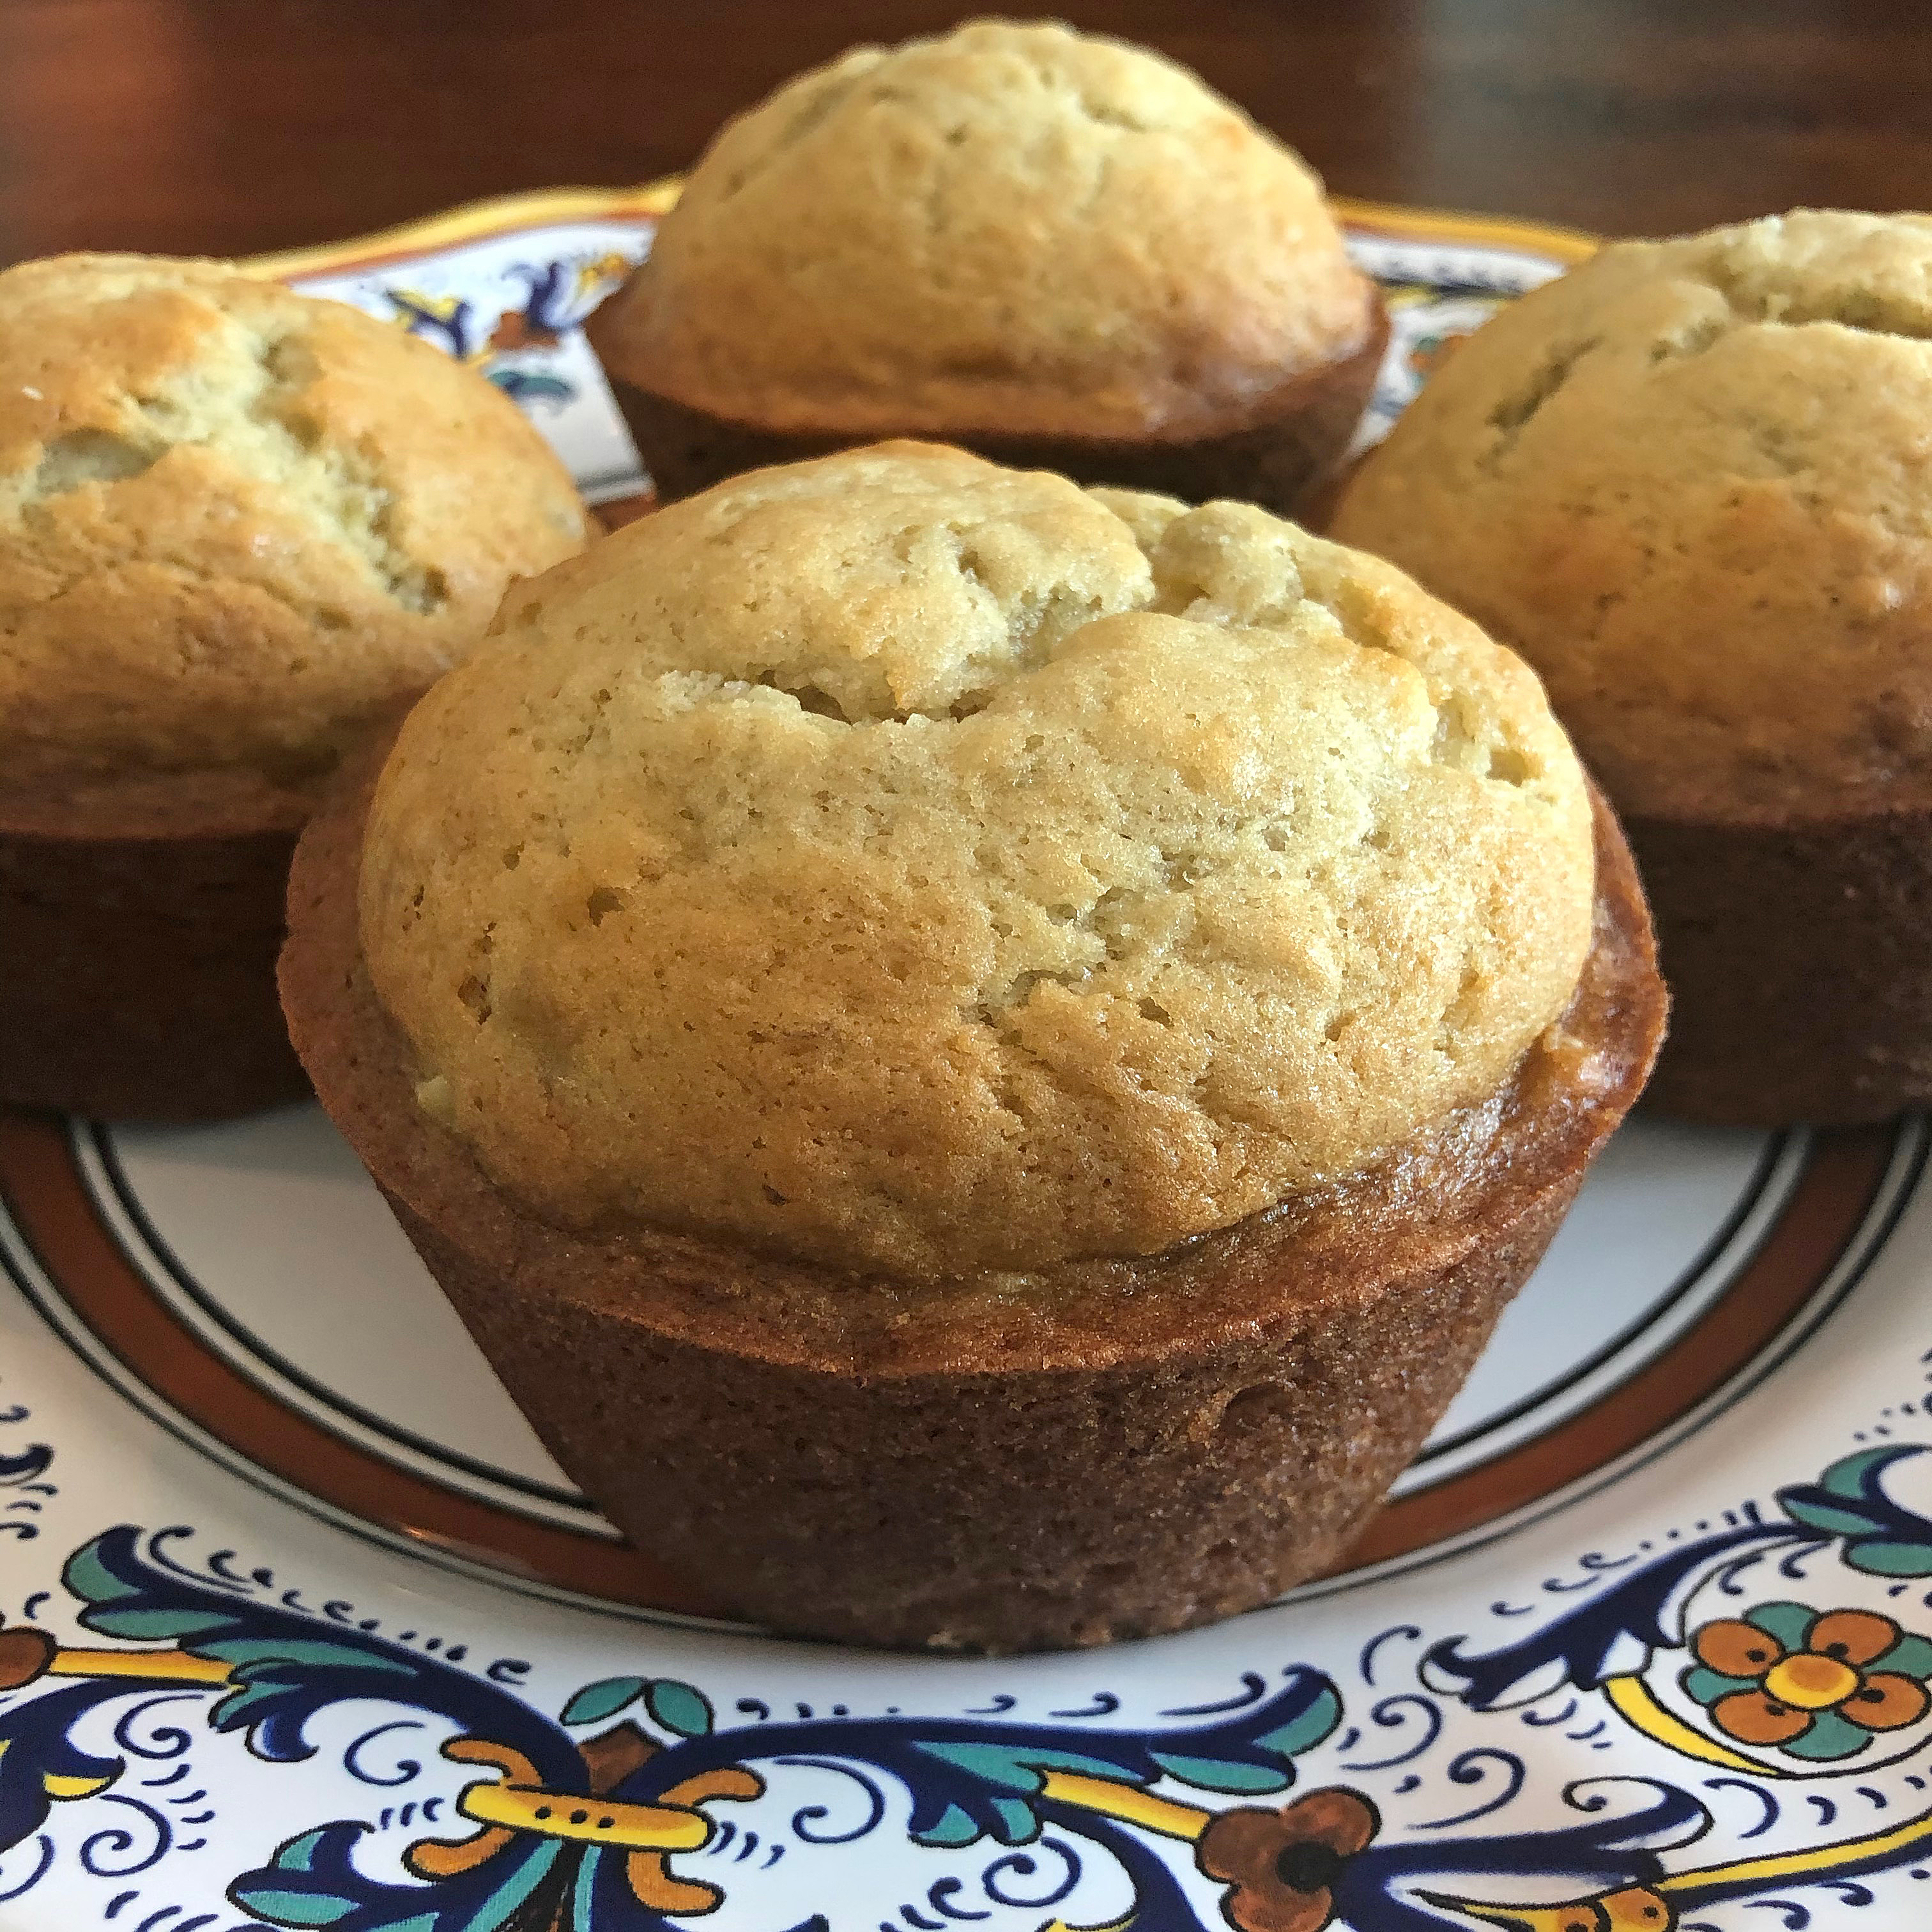 Breadwinners
Back in 2012 I posted this banana nut loaf cake recipe (which is really just banana bread, disguised with the “loaf” part). It has remained a family favorite to this day and I look forward to making muffins out of my Aunt’s recipe on our next go.
My friend Suzanne will be delighted to hear that Mrs. Copple’s banana bread recipe doesn’t call for nuts (shorthand for pecans, here in Texas). She and I continuously arm wrestle over whether banana bread should or should not have nuts and since I’m the fingers behind this post we know that “with nuts” wins. Yay me! But I will admit – this banana bread packs a great taste. Even if the nuts were forgotten! 🤠
Regardless of nuts and butter (or no nuts and margarine), I think we can agree we’re “breadwinners” when we enjoy a baked banana slice of home sweet home.
Foodie Tips
❤ You won’t see a bread picture in this post. Why? We decided to gift some of this sweetness to neighbors and thought muffins would be more portable than slices of bread. This recipe yielded 6 large (jumbo) muffins and 12 mini muffins (yielding 18 in total). For the large muffins you’ll cook about 25 minutes at 350°F; the minis were ready in 15 minutes.
❤ In addition to arm wrestling over nuts or no nuts, you can add butter vs. margarine to the list! We used butter in this recipe vs. margarine. Sorry, Mrs. Copple! During the 2020 COVID-19 lockdown all we stock is unsalted butter so that’s what we used. There are some culinary differences between butter and margarine that you might want to read more about in this post.
❤ I thought it interesting lemon juice was called for to prevent turning the bananas brown (the bananas wouldn’t be sitting out for a long period of time). But I’m not willing to risk a brown banana bread so in the lemon juice went!
❤ To serve, my favorite way to enjoy a bread or muffin is “toasty warm” with a smear of plain Philadelphia Whipped Cream Cheese on top! There’s nothing better!

i. Time
Total prep: About 40-75 minutes (depending on whether you make mini muffins or bread)
ii. Ingredients
1 stick | margarine or unsalted butter (my Grandmother “Nanny” always insisted on Falfurrias brand butter)
1 cup | sugar
2 | cage free eggs, at room temperature
1 teaspoon | baking soda
1 teaspoon | baking powder
1 teaspoon | salt
2 cups | flour, sifted
3 | bananas
a tad | fresh lemon juice

iii. What To Do
1. In a mixing bowl cream the margarine (or butter) and sugar together.
2. Add the room temperature eggs and beat well.
3. In a separate bowl add the baking soda, baking powder, and salt to the flour.
4. Mash the bananas and sprinkle them lightly with a squeeze or two of fresh lemon juice to keep them from turning brown.
5. Mix together the flour mixture and the creamed butter/sugar mixture.
6. With a spatula hand mix-in the bananas and your banana batter is ready!
7. Decide whether or not you’re making bread or muffins. Prepare your chosen baking pan (we used nonstick spray) and fill ¾ full.
8. Bake for 50-60 minutes for the bread; about 25 minutes for jumbo-sized muffins; or 15 minutes for the mini muffins… all until an inserted toothpick comes out clean.
Betty’s Son
Founder and “Nostalgic Food Blogger” of Betty’s Cook Nook

A Scan Of My Mom “Betty’s” Coveted Banana Bread Recipe (in her handwriting)
pumpkin bread
Posted: September 29, 2019 Filed under: desserts | Tags: allspice, baking powder, baking soda, cinnamon, cloves, eggs, flour, nutmeg, pumpkin, salad oil, salt, sugar, water Leave a comment
Fall Is In The Air
It’s hard to image Halloween without enjoying the time-tested taste of pumpkin.
Nowadays the season is ushered in with the arrival of anything pumpkin spice. Back in my younger days, however, pumpkin was simple, usually in the form of pie, flan, or bread.
Before we break into this bread recipe let’s have a look and some laughs at some vintage family Halloween pics from the good ol’ years! And before we watch the Hallo-slideshow, please click and listen to The Great Pumpkin Waltz by Vince Guaraldi. It sets the mood for pumpkin bread perfectly!
Foodie Tips
❤ I often get stumped on the material differences between baking powder and baking soda. This Bon Appetit article explores the yin and yang of these two essential baking ingredients.
❤ Fancy pumpkin? Take your tastebuds on a spin with my Mom’s other pumpkin bread that’s a kissing Cousin to this recipe… it includes raisins and pecans!
i. Time
Total prep: About 75 minutes
 ii. Ingredients
4 | cage free eggs, beaten
3 cups | sugar
1 cup | salad oil
20-ounce can (2 ½ cups) | pumpkin
3 ½ cups | all-purpose flour
1 teaspoon | baking powder
2 teaspoons | baking soda
2 teaspoons | salt
½ teaspoon | ground cloves
1 teaspoon | ground allspice
1 teaspoon | ground cinnamon
1 teaspoon | ground nutmeg
⅔ cup | water
handful | pecans, chopped (optional)
iii. What to do
0. Preheat your oven to 350°F.
1. In a large bowl mix together well the eggs, sugar, oil, and pumpkin.
2. In a separate medium-sized bowl combine the 8 dry ingredients and add to the pumpkin mixture. Add the water and mix well.

3. Pour the batter into 3 greased 8-inch loaf pans. You may have noticed that I snuck in some nuts (a.k.a Texas pecans) on top of two of the loaves. Just to keep me an honest Texan.

4. Place the loaf pans in the oven and bake at 350°F for 45-50 minutes, or until an inserted toothpick comes out clean.

Yield: 3 loaves. Each loaf will yield about 8-10 slices each!
Betty’s Son
Founder and “Nostalgic Food Blogger” of Betty’s Cook Nook
 Fancy Retro Halloween Decorations?
You’re not alone! Revisiting some of my old family photos has me wishing we still had our old decorations! You can still find some online at Vintage Beistle. Great stuff!
pumpkin bread
Posted: November 11, 2018 Filed under: desserts, other stuff, sides | Tags: baking soda, cinnamon, eggs, flour, nutmeg, nuts, oil, pecans, pumpkin, raisins, salt, sugar, water Leave a comment The Best Of Fall
It’s the most wonderful time of the year – when wearing flannel and smelling like patchouli is top of mind. Also top of mind? PUMPKINS! 🎃 There’s no better way to ring in fall’s greatness other than watching the fall favorite It’s The Great Pumpkin, Charlie Brown.
The Peanuts gang were probably my best friends growing up. In a time before you could record TV I never missed a show. I remember sketching Snoopy on top of his doghouse… and funny, I never thought it was odd that Snoopy slept *on top* of his doghouse rather than in it. Childhood innocence.
While your pumpkin bread is baking, come back and watch the movie below – share it with your family and friends and celebrate the way we were… and the way we are with the best of fall!
Foodie Tips
❤ I halved this recipe and made 2 medium-sized loaves. If you’re gift-giving or a lover of loaves, go all the way!
❤ One small can pumpkin? I presumed it was a 15 ounce can.
❤ The recipe didn’t note it but I greased my loaf pans before adding the batter.
❤ This bread is most great served sliced and toasted with a schmear of Phildelphia Whipped Cream Cheese.
i. Time
Total prep: About 75 minutes (minus resting)
ii. Ingredients
3-⅓ cups | flour
3 cups | sugar
1 teaspoon | cinnamon
2 teaspoons | nutmeg
2 teaspoons | baking soda
1 teaspoon | salt
4 | cage free eggs, beaten
1 cup | oil
⅔ cup | water
15 ounces | canned pumpkin
¾ cup (2 small boxes) | raisins
¾ cup | chopped nuts (a.k.a. “pecans,” here in Texas)
to top | more pecans (optional)

iii. What to do
1. Measure the dry ingredients into a large bowl.
2. Add the eggs, oil, water, and pumpkin. Mix everything well.
3. Fold in the raisins and the pecans.
4. Pour the batter into two large or four small loaf pans and bake at 325°F until the bread tests done.
ENJOY
Betty’s Son
Founder and “Nostalgic Food Blogger” of Betty’s Cook Nook

 One of my most cherished childhood items is this Peanuts cookbook. Originally printed in 1970 it still remains in my kitchen today, almost 50 years later!
This cookbook was not mine, originally… but at the magical age of 10 I was such a fanatic about The Peanuts Gang I was able to smooth talk this cookbook out of my neighborhood friend’s kitchen and into mine!

A Scan Of Mom’s Pumpkin Bread Recipe
Sous Chef Note: While acquainting myself with this recipe I noticed a credit to “Barbara Harris” and took to the internet to see if I could find out who she was. Turns out Barbara was a San Antonio restauranteur who ran some popular food establishments in San Antonio and Dallas.
I found reference to Barbara’s Pecan Pie Muffins in Karen Haram’s 50 Favorite “Good Taste” Recipes – these muffins are surely a culinary cousin to the Pumpkin Bread recipe above. Karen was a food author for the San Antonio Express-News for more than 30 years so you know these recipes have gotta be tasty… I have Karen’s Good Taste cookbook printed out for my culinary archives and you can score a digital copy of her fifty favorites here > Karen Haram’s 50 Favorite Recipes.
lemon light drop cookies
Posted: April 30, 2017 Filed under: desserts | Tags: baking powder, baking soda, eggs, flour, lemon extract, lemon yogurt, lemon zest, salt, shortening, sour cream, sugar 4 Comments the power of lemon
Those who know me well know my love for lemons.
I’ve grown a few lemon trees from seed, I make my own limoncello, and anytime I incorporate the bright, citrusy flavor into food or drink, I’m reminded of its amazing power.
puttin’ on the spritz
After mastering the simple art of the drop cookie, I was ready to raise the bar by trying my hand with my cookie press, which I recently discovered due to this cheese straws recipe.
My Mom “Betty” had a metal cookie press that I remember well, but where do pressed cookies come from? I wasn’t too surprised to learn they originate from Germany… all the way back to the 16th century. Spritzgebäck or “Spritz” cookies are pressed butter cookies that are made by squirting dough through disks that make a variety of cool-shaped cookies. The cookie press is like a baker’s version of everyone’s favorite childhood toy – Play-Doh!
 Hungry for more cookie history? You can learn a lot of interesting facts about the origins of cookies at this website.
foodie tips
❤ If using self-rising flour, decrease the soda to ¼ teaspoon and omit the baking powder and salt.
❤ The original recipe (below) makes about 70 2 ½” cookies. That’s right, 70! Since we weren’t having a party I decided to cut the recipe in half, which still yielded over 30 cookies.
❤ For the second half of my dough I experimented with my cookie press and was able to churn out some fun-shaped cookies*. Whether you try this or go the simple “drop” route, I wouldn’t suggest hand-rolling the dough into balls; these lost some of their charm and looked more like mini biscuits than cookies. So drop or cookie press all the way!
* Note: To get my cookie press to best form the dough, I chilled the dough-filled press in the freezer for a few minutes to stiffen the dough. I clicked the cookies onto an ungreased cookie sheet and voilà!
i. ingredients
to grease cookie sheet | shortening or cooking spray
1 ½ cups | sugar
1 cup | shortening, at room temperature
1 tablespoon | lemon peel, freshly grated
2 | cage free eggs
1 cup | sour cream or lemon yogurt (I used sour cream, my childhood BFF)
1 teaspoon | lemon extract
3 ½ cups | Pillsbury brand all-purpose flour
2 teaspoons | baking powder
½ teaspoon | baking soda
½ teaspoon | salt
to sprinkle | sugar
ii. what to do
0. Preheat oven to 350°F.

1. Let’s make the dough! In a large bowl, cream the sugar, shortening, and lemon peel until light and fluffy. Add the eggs and beat well. Add the sour cream (or yogurt) and lemon extract mix well. Lightly spoon the flour into a measuring cup; level off. To the batter add the flour, baking powder, baking soda, and salt. Blend well.

2. Drop by rounded teaspoonfuls 2 inches apart on a greased cookie sheet. Sprinkle the cookies with sugar before placing them into the oven.
3. Bake for 10-12 minutes, or until a light golden brown around the edges.
Enjoy!
Betty’s Son
Founder and “Nostalgic Food Blogger” of Betty’s Cook Nook


A Scan Of Mom’s Recipe Clipping
Here are some vintage Play-Doh commercials from me to you!
pineapple cookies
Posted: October 20, 2013 Filed under: desserts, The Best Of The Best Recipes | Tags: baking powder, baking soda, brown sugar, egg, flour, nuts, pineapple, shortening, sugar, vanilla 2 Comments
Fabulously Fruity
I had never heard of a pineapple cookie before but when Joe found this recipe in Mom’s cookbook I was excited; we had all the ingredients in our kitchen meaning treat consumption was near. We just needed to get the featured ingredient – the pineapple.
A quick trip to the store and back we started cookie production … Lah de dah … I was following the recipe and noticed that it ended at the bottom of the page Mom tore out of a magazine and there was no continuation of the recipe – no extra page! Click here to hear the sound in my head when I realized the recipe was incomplete!
I scoured the front and back of the page (below) containing the recipe and noticed a small callout for folks to send their old-fashioned family recipes to “Southern Living” – and if their recipe was used they would receive $5/each. Note to self: Southern Living. I also noticed a Lemon Jell-O Peachy Cream Salad recipe with a copyright of 1979. Note to self: 1979. With these two data nuggets I should have been lucky enough to find the recipe but the interwebs did not produce; I couldn’t find any record of the recipe – not even on SouthernLiving.com. But I found this one, which helped me interpret and fill-in the gaps.
Pineapple is one of my most favorite fruits of all. I hope you give this recipe a whirl!
foodie tips ~

♥ I added the nuts. “Nuts” is an abbreviation for Texas Pecans, y’all.
♥ I read several online complaints about cookies like these being soggy and wet. Follow these instructions! Make sure and DRAIN the pineapple. I had no problems with soggy cookies!
♥ I recently purchased a cookie scoop which makes forming cookies a snap. Give it a squeeze and see!
♥ I’m confident iodized salt was used back in the day. Today I’m a salt lover and have five salt varieties in my kitchen. I used a kosher salt for these cookies and was treated to a little kick of salt in-between the pineapple nuggets. I liked.
i. ingredients
1 ¾ cups | all-purpose flour
½ teaspoon | soda
¼ teaspoon | baking powder
¼ teaspoon | salt
½ cup | brown sugar, firmly packed
½ cup | sugar
½ cup | shortening
1 | cage free egg
1 teaspoon | vanilla extract
½ cup | crushed pineapple, drained
½ cup | chopped nuts (these are not optional says me)
ii. what to do
0. Preheat oven to 375°F.
1. Combine flour, soda, baking powder and salt; set aside.
2. Combine sugars and shortening in a large mixing bowl (I used my Kitchen Aid); cream until light and … [ here’s where I pick up with the rest of the instructions ] … chunky.
3. Beat egg and vanilla into creamed mixture.
4. By hand stir-in the pineapple and nuts.
5. Fold-in half of the dry ingredients from step 1 above into the creamy mixture. Hand mix until well blended. Add/mix/blend the last half of dry ingredients.
6. Drop rounded tablespoonfuls of the cookie dough onto a greased cookie sheet.
7. Bake until light golden brown, about 12-15 minutes. If the first tray turns out a bit crispy, reduce the baking time on the next go.
Yields: About 24 cookies

banana nut loaf cake
Posted: May 6, 2012 Filed under: breakfast, desserts, sides, The Best Of The Best Recipes | Tags: baking powder, baking soda, banana, butter, buttermilk, eggs, flour, nuts, sugar, vanilla Leave a comment Fresh From The Family Archives!
My cousin Julie revved-up her scanner and shot me some recipes from her San Antonio kitchen last week. This tasty banana nut loaf cake recipe was one of them… and hailed from Delores’ kitchen (her handwriting is shown on the recipe below).
Julie’s mom “Delores” was Mom’s sister… and “magically,” the Kiker family always referred to her as “Sister”… and her husband, “Uncle Bill.”
Julie said: “This is another recipe I thought my Mom got from your Mom. She made it several times and then taught Jeannette how to make it. Jeannette made it probably a zillion times for her! My father just loved that banana bread ~ or at least my Mother thought he did!”
Let’s Go Bananas!

i. ingredients
½ cup | butter, softened (use Falfurrias butter per my Grandmother Nanny)
1½ cup | sugar
2 | cage free eggs, beaten well
3 | bananas, mashed well
½ cup | nuts, finely ground (I like pecans)
½ teaspoon | baking soda
4 tablespoons | buttermilk
1½ cups | flour
1 teaspoon | baking powder
1 teaspoon | vanilla
ii. what to do

0. Soften your butter. See tip below!
1. Preheat oven to 350°F.
2. In a large bowl, mix the first five ingredients.
3. Dissolve the soda in the buttermilk; add to the first five ingredients.
4. Mix the flour with the baking powder; add to the ingredients along with the vanilla and mix well.

5. Grease the bottom of a loaf pan (roughly 8.5″ x 4.5″ x 2.75″) then line the bottom of the pan with wax paper.
6. Pour batter into baking pan and bake at 350°F for 1 hour and 15 minutes.
Foodie Tips ~
♥ Ahhh, softening butter. I’m usually in the heat of the moment before I realize I need room temperature butter but it’s still in the fridge! If you’re short on time and can’t wait the 30-60 minutes for your butter to soften on the countertop, here are some helpful tips for how to accelerate things. I usually cut the butter into 1/2″ slices and set them near my preheating oven and usually in about 15 minutes things are ready to roll.
♥ This recipe was surely a family favorite ~ the measurements for how to make *three loaves* is noted in the original recipe below (see the circles)!
♥ Julie says this recipe is a good use for almost-bad bananas.
♥ You can also split this into two smaller loaves. I used foil pans that were 8″ x 3-7/8″ x 2.5″ and kept one and gave one as a gift.
♥ Who’s Jeanette? Click here and learn more about Jeanette and her famous oatmeal cookies!

A Scan Of Mom’s Original Banana Nut Loaf Cake Recipe (a.k.a Banana Bread)


